This is Ammon posting. When we first got married like so many other newlywed couples, we were without any furniture to speak of. Luckily my Aunt Nancy was looking for someone to give a good home to what was my grandparents kitchen table and chair set. So since the price was right and we needed something to hold our plates while we ate, we gladly took them in. In this picture you can see what I'm talking about.
 |
| Stick 'em up! A young gun-slinger at Grandma and Grandpa Johnson's old kitchen table and green vinyl, metal backed chair, circa... 1950?, 1960?, due for retirement to the sewing room. |
Well after a while Jackie started hinting that she thought the table wasn't a long term solution and that the chairs were less than comfortable. After moving into a house with a garage I no longer had the excuse that I couldn't build a new one since I didn't have anywhere to work. And purchase a table? Well, for the same amount of money and a whole lot of time (always counted as $0/hr for the sake of justifying these projects) I could build a table plus fill my garage with tools. But first I needed material to build it with. So, ironically, I went to the same place where my current table had come from, the family farm.
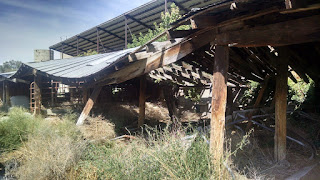
Some readers may not know I grew up on a dairy farm. But the dairy part of it has since gone away. It has been about 10 years since my dad stopped milking cows. So there was a cow shed that had been ignored for that same amount of time. Not sure what first gave me the idea to use the wood from the barn to build a piece of furniture, but it got in my head and stuck. It was further reinforced whenever I saw a piece of furniture of similar style like the table at Jackie's uncle Mike's house in Denver. I'm sure the nostalgia of having a piece of the farm re-purposed for something new was another motivating factor. So anyway we went to the farm to find material and this is what we found:
 |
| One man's dilapidated cow shed is another man's dining table. |
It took quite a bit of sorting to find enough material with the right thickness and character we wanted, but after a couple trips this is what we brought back to the garage:
 |
There was more than this, but I won't show the stuff that was covered in manure you get the idea. |
 |
| Who says nails are tough? (just a few of those removed) |
So now I had the material, next I needed a design. And tools. And no, this is not the normal order of an engineering-manufacturing workflow. I pretty much made it up as I went, which went against all the professional training I have received, but is also what made it so much fun. We wanted a table that was a little larger, but not too much larger because it wouldn't fit in our dining room otherwise. It was tricky coming up with something that would work with the limited material we had, but after a couple iterations and rough sketches, and measuring and remeasuring every board I finally had a plan that I thought was workable.
Before I could do any cutting I had to get something to cut with. So I began spending hard earned money on tools which
I hate is an urge I can't resist!! (I'm sure there will come a time when I need those 10' pipe clamps again).
  |
| 10" sliding compound miter saw. Overkill? I think not. (No really, I had to cut 12" wide boards for this project so it WAS justified) |
 |
| Power hand planer. Didn't actually know these existed before, but very useful for making very crooked planks approximately straight and flat. |
 |
| 6" orbital sander, a must. Can't believe I went this long without one. |
 |
| The table saw I already had, but it had lived in mom and dad's garage its whole life. I had to put it up on blocks (not-OSHA approved) to get enough height to reach the top of the workbenches, which were another side project that I did along the way. |
 |
| The 10'ers, now banished to a corner. |
 |
| One time I was at Harbor Freight and some stranger said to me, "A man can never have too many clamps." How true. |
Sadly, there were some tools that at this point I just didn't want to spend the money on. Like a planer and jointer, big ticket items that also take up a lot of garage real estate. Good thing that I have great neighbors that also have garages full of tools. I borrowed a 13" dewalt planer which did the heavy duty planing and material removal. Before this I used the hand planer to take out the warp which was prevalent in all the wood. Normal planers spit out a board just as crooked as you put in. So with this hand held one I could remove the high spots to even it out. This was a long (and very loud) process and I'm actually surprised it worked as well as it did. The cutting and planing was probably the funnest part of the project, and I didn't take any pictures of it, except this:
 |
| This isn't even a quarter of the sawdust I made along the way. I thought I had more pictures than this. But there is enough dust still hanging around that I could round it up and get another picture. Another interesting thing was how the smell of the wood changed from near the outer surface to further inside the board. |
I came to find out my back yard neighbor had a sound proof, dust proof wood shop in his basement. So when I needed a jointer he was gracious enough to run my boards through it for me to get nice true, straight edges.
Also, since all engineers have the same tool collecting affliction, I was able to borrow a Kreg pocket hole jig, and a router from my coworker Garth. This is the routing table I rigged up to make the tongue and groove joints to hold the table top pieces together.
A quarter inch straight cutting bit was what I used to put these grooves along the edges:
I cut some thin strips of 1/4" MDF to use as the joining material between the boards. Putting this in between with some glue, then clamping it together brought the table top pieces into one.
Here I am again omitting a lot of photographic documentation, because I forgot. I guess when you're having fun it just doesn't come to mind to take pictures. But I glued, clamped, screwed and bolted everything together and it came together mostly how I had envisioned. For the stain on top we chose English chestnut, and the bottom is walnut.
 |
| This is the table top after a couple coats of stain. |
After the stain came about 6 coats of polyurethane. Here is what the finished product looked like, before small children started plastering it with their dinnertime flotsam and jetsam:
 |
| Who knew some beat up, forsaken, cattle crapped on lumber could become this? |
Jackie found a set of six chairs that match the dark walnut color on the base of the table. So our new dining set looks pretty good together. It also matches our kitchen cabinets pretty well.
  |
| My favorite things about it are the bolt holes and the large black crack at this end. |
 |
| It looks very different without the flash. |
If I did it again I would certainly do things a little different. I didn't consider the clearance height for legs under the table, and would certainly make more room under there next time. But we are pleased overall.


